5 Expert Tips for Using the Summit Evolution Photogrammetric Workstation
The Summit Evolution photogrammetric workstation from DAT/EM System International offers a suite of photogrammetric tools at an affordable cost. We work with a variety of industries, from American DOTs across the nation to professionals working in the forestry and agriculture industries.
Our software takes aerial or terrestrial-based imagery, like those taken by drones, and, once properly oriented, displays those images onscreen in such a way as to allow the operator to view them in 3D. This further allows digitizing features of interest for subsequent engineering studies, GIS analysis or utility management. Summit Evolution offers many useful tools, such as automatic orientation capabilities, visualization and feedback features, unlimited zoom levels, and much more.
If you’re new to using Summit Evolution as your personal photogrammetric workstation or are considering trying it out, there are several key tips you need to get started successfully.
Want to get started with Summit Evolution? Start with a free demo.
1) Choose the Right Summit Evolution Licensing Level for Your Needs
The Summit Evolution comes in a range of licensing levels. You can see our full feature comparison here.
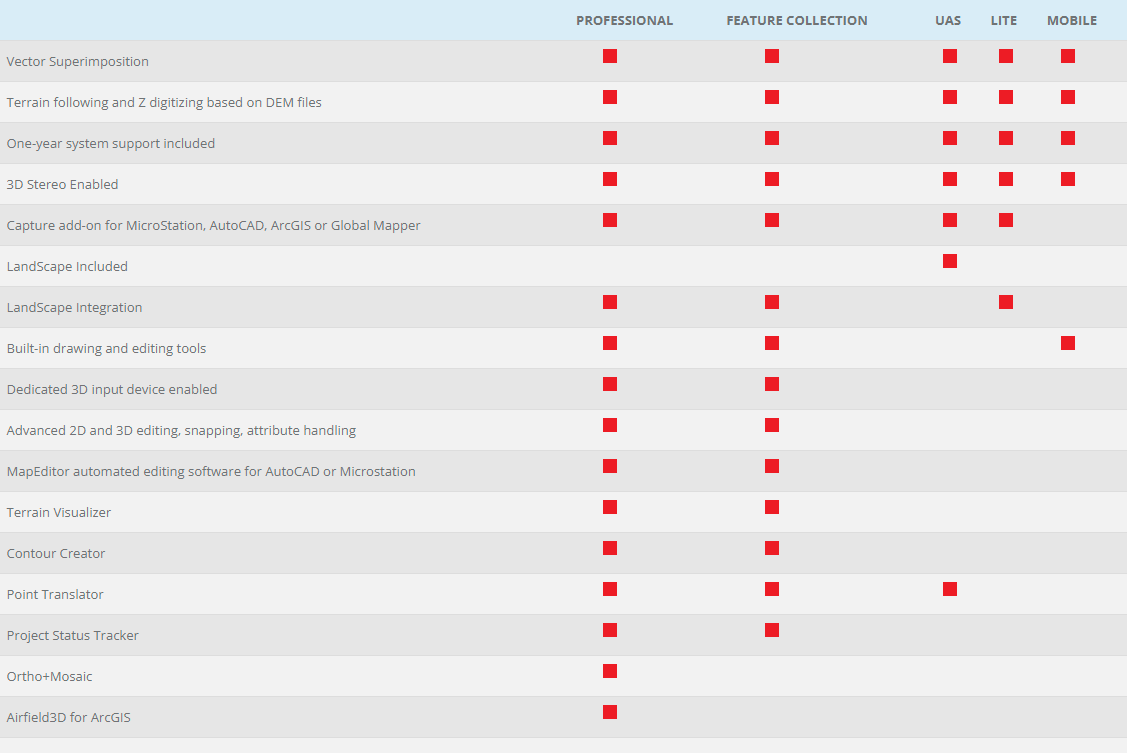
If you have minimal needs, our Lite version is ideal for resource specialists who only require a visualization tool or limited stereo editing capabilities.
We recommend our Feature Collection product level for clients who already have a software that takes care of their ortho processions, orientation, and project setup needs.
If you want the full package, then our Professional product level offers all of our features, including Orientation, Orthorectification and Airfield 3D for specialized airfield mapping within the United States.
We also offer a very useful LiDAR toolset called LandScape which can be used in conjunction with Summit Evolution for point cloud data editing, visualization, classification and translation.
If you will be primarily dealing with UAS data, Summit UAS includes all the features included in Summit Lite in addition to Landscape, which allows you to analyze UAS data in 3D stereo. However, as a note, Summit does not process UAS data. Rather, it utilizes pre-processed UAS projects from software such as Agisoft, ICaros, or UASMaster.
Not sure which licensing level is right for your industry needs? Speak with a sales rep to learn more.
2) Make Sure You Meet Our Hardware Recommendations
To successfully use the Summit Evolution photogrammetric workstation, you need to have the right setup. You won’t be able to simply download our software and start seeing in 3D.
We’ve put together a handy configurations guide with our recommendations for the hardware and software you should invest in. And our team at DAT/EM is always happy to help guide you if you’re having any issues with your system or are not sure what you should buy.
As a quick overview, here are a few of the things you’ll need to check off your list:
- A PC Computer or Laptop: PCs are better suited for meeting your photogrammetry needs, but a laptop is a suitable option if you need your workstation to travel with you. However, please note that you’ll only be able to use your laptop’s built-in display as a side monitor and will need an external display to view stereo. We suggest a Dell Precision 17 7000-Series (7720 or better) Mobile Workstation. If working from a desktop PC, we recommend a Dell Precision T7920 Workstation or a high-number Dell 7000-series PC.
- Windows 10 Operating System: You’ll need the Professional or Enterprise version.
- High-Quality Processor: We recommend the Intel i7-7700HQ Processor Quad Core 2.8GHz or better for laptops and the Six Core Intel Xeon with 2.4GHz processors or higher for PCs.
- Stereo Display: You have several choices for your 3D monitor, which may require a 3D input device, glasses, and emitters depending on the system you choose. Your choices include the Schneider Digital 3D PluraView, VRLOGIC SeeHawk3D, Vision Engineering Contour and Vectour, or nVidia 3D Vision.
- Additional Monitors: You can add an additional LED/LCD monitor to your setup. It’s preferable to connect with a Display Port connector, and you can add as many monitors as there are free Display Ports on your video card.
- Other Hardware Needs: Make sure you have enough memory to support your photogrammetric needs. Generally, you need at least 32 GB of SDRAM (64GB if Trimble Inpho 3DX is installed). You should shoot for 1000W or higher for power supply, and make sure you have enough USB ports available. Your hard drive should be a 1 TB SATA Solid State Drive or better, and you need to purchase the graphics card that is compatible with your particular 3D display.
3) Ensure Best Practices When Capturing Drone Images
A high-quality 3D map starts with good camera work. If you use low-quality equipment or make mistakes when capturing images, there will be flaws in your 3D map.
3D vectors are created using different perspectives from images of the same location. Drone images are geotagged, making them easy to process for photogrammetry. However, you need to follow photogrammetry best practices when capturing photos.
For one, you need to make sure there is an adequate overlap to provide the most accurate data. Generally, your goal should be to achieve an overlap and sidelap of 75%. However, this depends on the size of the area and type of terrain. Smaller, more uniform areas are easier to get a higher overlap. It may take more flight time to achieve a high overlap for larger areas with a shifting landscape.
You’ll also need to choose the right altitude for your particular drone to achieve a standard resolution of at least one inch. You’ll also want to consider if a normal lawnmower pattern or a grid pattern is best for the terrain you’re mapping.
Many experts recommend drone pilots use the autopilot feature to reduce errors and create a more accurate map, and you want to make sure the lighting and weather conditions outside are ideal for shooting.
Finally, make sure you use a high-quality lens and a snapshot shutter as opposed to a rolling, or continuous capture/download shutter. You don’t want to either overexpose or underexpose images or create a blur. Always take time to review the images you shot with your drone before processing them, making sure to delete any blurry photos.
4) Use the VISIT Tool to Quickly Revisit a Project Location
When using DAT/EM Capture, use the VISIT tool to easily catalogue your primary editing locations and re-visit them at a later time. With this function, you can “Record to fie” all locations you click on and then view them again using “Play from file.”
This feature can help you quickly review edits you made while working in Summit Evolution or present project areas to others. You can also move to absolute X,Y,Z coordinates or move to specific vector features using the Visit Tool.
If you want to see this tool in use, watch our tutorial below.
5) Contact DAT/EM Support If You Still Have Issues
If you run into any issues with Summit Evolution or have any questions or suggestions you’d like to run by us, our support team is happy to help. We pride ourselves on offering the best customer service and can create customized solutions for our clients.
With our annual support plan, we can respond to requests within a day and often have a solution in a week. If our customers need a tool, we can often deliver a beta within a couple of days and may implement that tool in our next update if it’s successful.
All of our software purchases automatically come with a free year of support, which includes help with software updates as well as email and telephone support service.
Want to see all that Summit Evolution has to offer? Schedule your free demo.
Comments are closed.